
If you read David's blog about story mapping, you may have gotten extremely excited to try it out﹘and then the fear and doubt set in. Maybe you are smack in the middle of a project, and the thought of starting the planning section over, or worse throwing away all of your hard work, seems extremely wasteful and frustrating. You keep circling back to the visibility and flow story mapping shows and wishing you could benefit.
Well, folks, I've got good news. Just because you are in the middle of building something doesn't mean story mapping isn't for you. I'm not gonna lie. It's gonna be a bit of work, but it will be well worth it.
Building the Map
Start where you are
The first step is to collect all the user stories you already have. If you are using a physical board, promise me you won't steal the team's cards away from them. Rather, transcribe the few they are in the middle of working on to new cards. If you are in JIRA, VSTS/TFS or another tool, print out all of your tickets. Yes, even the closed ones (this will make sense when we get to the "Fill in the Gaps" portion).
Next, organize them into piles that make sense to you so you can easily find individual stories. Digging through 150 stories to find the one you are looking for will likely frustrate the crud out of you.
Now, a word of caution: User Stories tend to be nouns/features, whereas you want your story map to be verbs/actions/steps, so just starting from your existing backlog can create some friction. We are, instead, going to start with a simple journey map.
Map the Journey
This will be the backbone of your Story Map. It may be easier to think of this as a very high level, simple journey rather than going as in-depth as you might initially with the Story Map. You want to get the flow out, without worrying about the details yet.
Grab a pad of sticky notes (Pro tip: Super Sticky Post-Its™ are the best for vertical surfaces), a Sharpie, some painter's tape, and claim a large wall. Just like building a Story Map from scratch, you want to start at the beginning. Ask yourself: How does the user flow through your product? Where do they start? It is usually easiest to start with the main persona's journey, so write each step of their journey on a separate sticky.
Pull in Existing Tickets
As you come across those steps that already have a User Story, tape that up instead of writing a new note. This may be the majority of the steps. If that's the case, awesome!!
Your map will look something like the one above. The white cards represent the printed User Stories from your system of record or physical Product Backlog. The colored squares represent the new stickies.
Filling in the Gaps
You will likely find you have holes in your Story Map when it's presented like this. You may also realize you were missing some pretty important activities, steps, or details that would have snuck up later in the project or right before release to bite you.
Here's where the magic happens: The biggest issue we tend to have with our giant 150 ticket backlog is that not everything is truly vertically sliced nor are they sized correctly. When we take those 150 stories and place them where they belong in the steps of the user's journey, we find the places that we should roll things up. Things we thought were independent are really creating dependencies. We find tiny little stories when we could deliver one large chunk easily inside of a sprint that is fully valuable and a complete thought.
Once you have everything out there, find the themes. These are called "Activities". They are the big, well, activities a user will accomplish that may have numerous steps within them. Large things like "manage email" or "upgrade" fall into this category.
Determining your "Release"
Yes, release is in quotes. This is because we are decoupling planning with release. Release is just the shorthand I'm using for a planning increment. You can think of these as Marketing releases or milestones. They don't have to be done in a physical release. You may be doing continuous delivery which will mean things are "released" just not turned on. Or you may be releasing small increments, and testing them out but not doing a big bang announcement of the whole featureset. It doesn't matter how you do it, just do what works best for you and your team.
First, you need to make sure the details under your steps are in priority order: must-haves at the top, nice to haves at the bottom. Then, take a roll of blue tape and wind your way through the details until you have determined what will be in your first "release".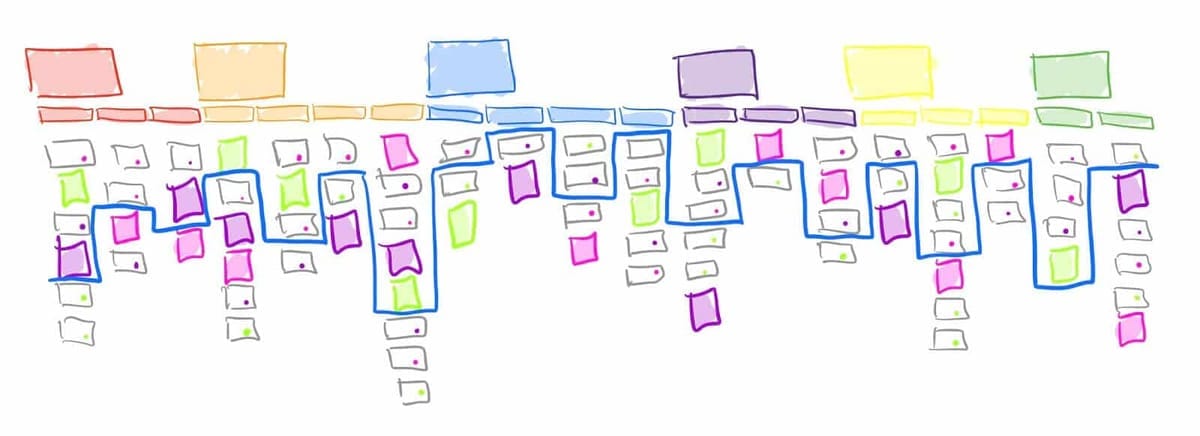
If winding through like the above example impedes clarity, you can create a tape line and move the cards that don't belong in the first release below it, like so:
Track Your Transformation in Real Time
Path to Agility Navigator maps your teams against 100 capabilities and shows exactly where to invest for the outcomes you need.
Bringing Clarity to the Chaos
Organization is extremely important to being able to read the map. You don't want just a wall of words﹘that looks chaotic. You want to be able to tell a very simple story while demonstrating that you can dig into the details when important.
Epics vs. Stories vs. Tasks
So are the "activities" on the top row considered epics, the "steps" the stories, and below that the tasks? Or is that top row something else and the steps are epics and the options stories? The short answer is that it doesn't matter: do what's right for your teams and the products you are working on. If the steps are things that can be completed inside of a sprint, they are probably more at the story level. If they are huge, two to three sprint things, they are likely epics. Again, the best bet is to take it to the team.
Color Coding for Personas
You may want to color code if you are building for different user segments or different personas. For example, if you are building for mobile, web, and call-in users, different color stickies will create visibility into those segments like in the example below. Adding colored dots to the printed tickets will continue the visual color coding. It is helpful to put up a legend at the side so anyone can see what the colors mean at-a-glance.
Keeping it Alive
As with most things of this nature, if you just attend to it once, it's outdated as soon as you walk away. A story map should be kept updated and be a living document throughout the project. When you find new steps or details, put them up there, update your priorities, and show progress. A great way to show progress is by simply indicating the ones that are done by drawing check mark on them in a bold color.
So there you go. In a few straightforward steps, you've taken your unruly backlog and created a living asset that your team and stakeholders can use to easily see the bigger picture﹘all mid-project! This should help you and your team get on the path to creating a better product and building the right things no matter where you are in the development process.
If you missed Story Mapping 101, just click here to go back and read that as well!
We also cover story mapping in-depth during our Certified Scrum Product Owner class. Check it out.
Where Does Your Organization Actually Stand?
18 questions. 4 minutes. Get scored across 9 Business Outcomes and see exactly where to focus.


